|
|
Overview
Salesforce Community sites by default gets generated with domain as site.com or force.com. We can customize the url of our own choice using custom domain and custom url setup.
If you don’t have your domain and are confused where to start and wish to implement this feature in your personal org before applying this on actual work assignment .But not sure where to get started!! In this article we will answer all these questions and provide a complete guide to implement this feature.
We will go through on how to register and get a free domain, manage DNS settings and setup custom domain and custom URL in salesforce.

Steps
- Enterprise Edition Org Sign Up.
- Domain name registration and DNS settings (CNAME mapping).
- Custom Domain Provisioning.
- Custom URL setup.
Detailed Description
1. Enterprise Edition Org Sign up:
1.1 We need to sign up for the salesforce edition where we can create both domain and site. ‘Add a domain’ action is not available in the developer edition, and is available only in Professional, Enterprise, Performance, and Unlimited Editions.
1.2 Navigate to below path and signup for Enterprise edition.Please note enterprise edition provides 30 days free trial https://www.salesforce.com/form/signup/freetrial-service-ee
1.3 Login in to Salesforce→Setup→Domains→Add a Domain. Here, copy CNAME value.It will be in format [domain].00d2w00000qjx61eah.live.siteforce.com

2. Domain name registration and DNS settings(CNAME mapping)
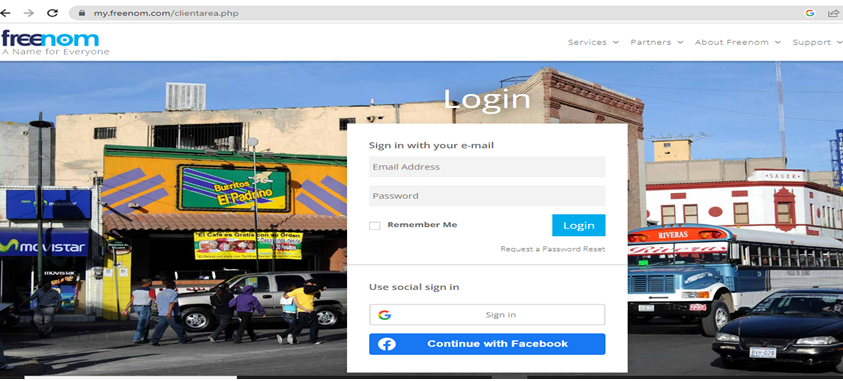
2.1 Open below url and signup to create your account http://www.freenom.com/en/index.html
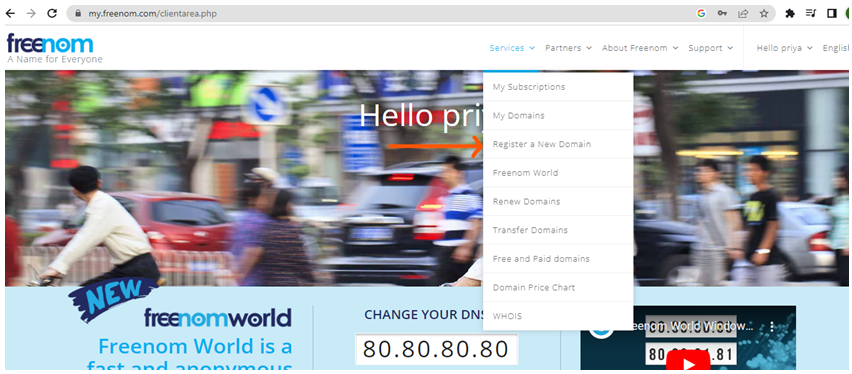
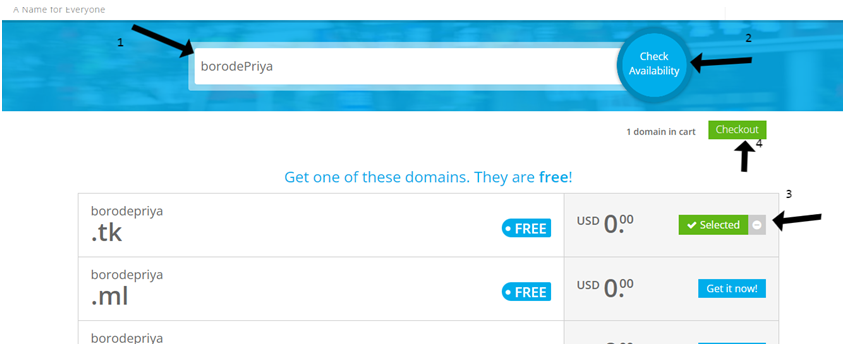
2.2 Services → Register a New Domain→Under Search bar search for available domain name →Click Check availability →Choose domain from free list→Click Checkout
2.3 Complete checkout Period →12 Months Free→Continue→Review and Checkout→Accept Terms and condition→Order Confirmation


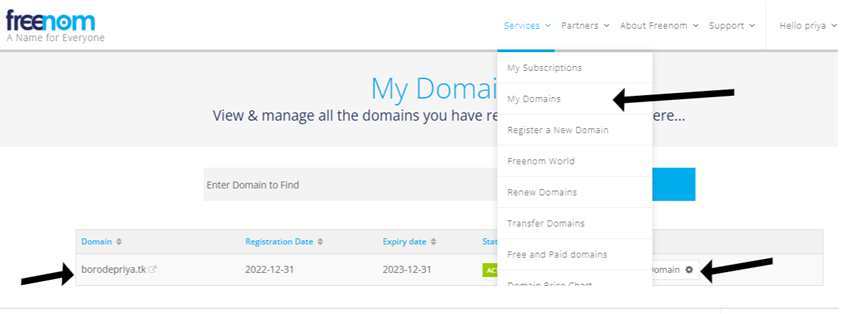
2.4 Navigate to Services→My Domains→We will be able to see a new domain which is registered.
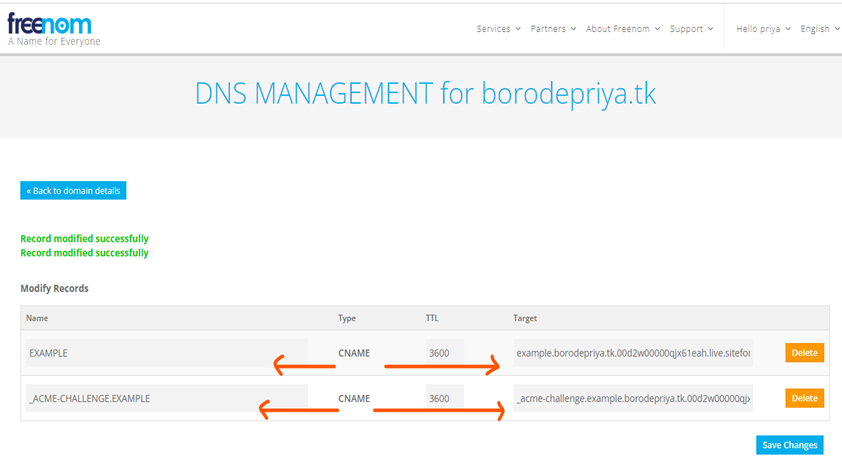
2.5 Manage DNS settings On client area →Manage Domain→Manage Freenom DNS→Create 2 CNAME records in below format
| Name | Target |
| <SubName> | [Domain].[OrgId].live.siteforce.com |
| _ACME-CHALLENGE.<SubName> | _acme-challenge.[Domain].[orgId].live.siteforce.com |
2.6 Here [Domain].[OrgId].live.siteforce.com : This is the format which is mentioned in step 1.3 Replace [Domain] with value created in step 2.4 and [org id]> mentioned in step 1.3
3. Custom Domain Provisioning
3.1 On enterprise edition→Setup →Domains→Add a domain
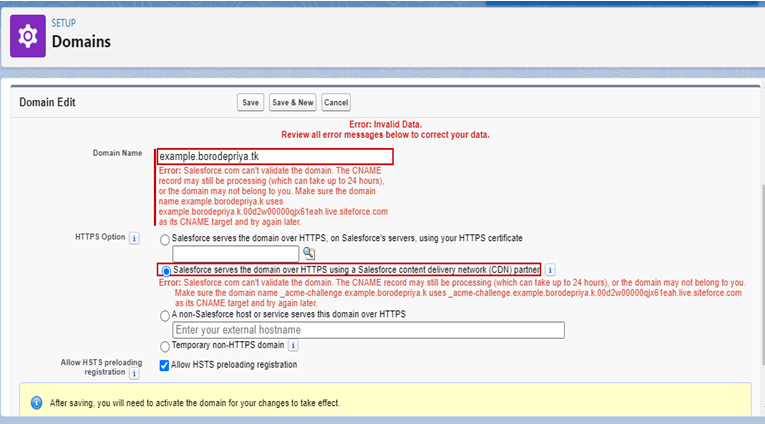
- Domain Name : Provide your domain name .In our example domain is example.borodepriya.tk
- Choose 2nd option Salesforce serves the domain over HTTPS using a Salesforce content delivery network (CDN) partner
- Associated Org : Production
Note : This option will not be available for selection on free trial enterprise org. If testing for sandbox select the associated sandbox here.Eg DEV,SIT etc.
- Click Save.
3.2 If there is any error on save below could be possible reasons
3.2.1 Verify CNAME records are created as pointed in step 1.1.5
3.2.2 DNS settings done at step 2.6 takes time to propagate . In our example it took 15-30 minutes.

3.3 If you are able to save records Record status will change to Provisioning .Wait for it to change to Awaiting activation.Please note this takes time.In our case it took 1 hour to complete provisioning.

3.4 Next click on activate .This will take 5-10 minutes and Status changes to complete.


4. Custom URL Setup
4.1 Setup→Custom URL→New Custom URL→
- Domain : Select domain provisioned in step 3.
- Site : Search and select store to which custom url needs to be mapped.
- Path :Enter the path to append to the custom domain to access your store.
- Save

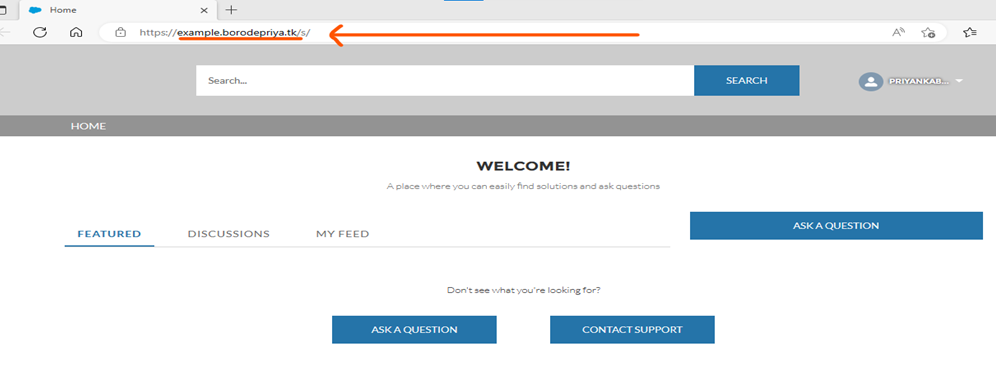
That’s it . We are done.Open the community site and on the URL bar you can see your own domain name.
Note
- If domain and url setup is done for testing on sandbox .Step 3 Custom domain creation will be on Production and associated org will be sandbox such as DEV,SIT etc.After domain is provisioned.Custom url creation will be performed on sandbox org.
- If domain and ur setup is done for production .Step 3 Custom domain creation will be on Production and associated org will be Production.After domain is provisioned.Custom url creation will be performed on production environment.
References
Author: Priyanka Borode (4x CPQ Salesforce Certified and Oracle Siebel Consultant)
Further Reading:
Salesforce DevOps challenges that you need to overcome in your project
If you are looking to become an expert in Salesforce, check out this blog
Blogs
